It is possible to add custom information for each individual contact in Trombinoscope Contacts Pro, in addition to the information fields you can already select.
To achieve this, we take advantage of 3 events that are built in the extension.
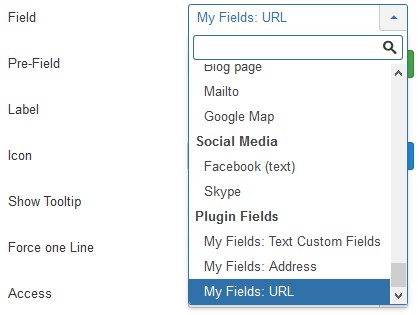
With this tutorial, you will be able to add a new field type following the examples available in the sample plugin 'My Fields', which includes:
- a field type that outputs a link,
- a field type that outputs addresses on one line only,
- a field type that outputs a list of custom fields values of Text type,
- a field type that outputs values of a repeatable custom field made of text fields,
- a field type that outputs the last 3 articles created by a contact.
For this tutorial, you need:
 Trombinoscope Contacts Pro
 My Fields information types
- Some knowledge in PHP and HTML
You can use the plugin plg_trombinoscopecontacts_myfields
as-is, but its usage is limited and is meant for learning purposes.
To test the Text custom fields and Repeatable field, you can select the fields among the plugin's parameters.
The plugin is available in English only, but you can easily internationalize it by adding your own language files (in this case, myfields.xml will need to be updated accordingly) or by creating language overrides.
Step 1 Install the plugin (not on a production site). It will be found under plugins/trombinoscopecontacts/
Step 2 Open the plugin file myfields.php. The code is documented with key information.
Step 3 Go to the method onTrombinoscopeContactsPrepareFieldSelection. This is the code that will be called whenever the select box containing all the information types is created.
Step 4 Add the name of the type you want to see as information type to the array of information types.
$information_types[] = '[information type]';It could also be:
$information_types[] = array('[information type]', true);The second parameter tells the system that the field can also be used as a link field (showing as a clickable icon, independently from the other fields).
Note The information type is made of [the plugin name] _[the type]. For instance : myfields_url.
Step 5 Go to the method onTrombinoscopeContactsRequiredCoreFields. In the array that is returned, add a value corresponding to your new type. This is important because Trombinoscope Contacts only selects the contact fields that are needed from the Contacts table in the database. If your new type is a combination of some of the core contact fields, add them to the list to ensure they will be available for the output.
Note Custom fields do not need to be listed.
Step 6 Go to the method onTrombinoscopeContactsGetFieldData. This is the code that will be called whenever items are shown in a card. For parameter explanations, check the source code.
Step 7 The output code is placed into layouts that you can override.
On plugin install, the sample layouts are moved into the extension (into /layouts/details). It is imperative that the layouts are placed there in order for them to be taken into account. You can override them in your template.
Layout files must follow the convention: tcp_detail_[information_type].php
Note For the list of icons you can use as default for your type, go to documentation/common-features/icon-picker-common.
Step 8 Save your code.
Step 9 Open the file en-GB.plg_trombinoscopecontacts_myfields.sys.ini.
Step 10 Add the key/value pair that corresponds to the information type that you have created. Follow the convention: PLG_TROMBINOSCOPECONTACTS_[plugin name]_FIELD_LABEL_[information type]
Copy, duplicate and customize the code at will and show information you need for your next project!